To clean a riding lawn mower carburetor, first remove it from the engine and then disassemble it for a thorough cleaning. Use carburetor cleaner and compressed air to clear out all passages and jets.
Maintaining a pristine carburetor is crucial for the optimal performance of your riding lawn mower. Over time, carburetors may become clogged with debris and residue, leading to engine starting issues or poor performance. A clean carburetor ensures that the right mixture of air and fuel is delivered to your mower’s engine, making starting easier and running smoother.
Regular cleaning can extend the life of your mower and save you from costly repairs. It’s a task that can be done at home with a few simple tools and the correct cleaning supplies. Don’t let a dirty carburetor slow you down. With a bit of care and maintenance, your riding lawn mower can continue to run at its best.
Preparing For Carburetor Cleaning
Your riding lawn mower relies heavily on a pristine, well-maintained carburetor for optimal performance. As the cornerstone for fuel delivery, a clogged or dirty carburetor can lead to poor engine performance and decreased efficiency. The process of cleaning this vital component requires precision and care, so preparation is key. Below, find the steps involved in preparing to clean your riding lawn mower’s carburetor, ensuring a smooth and effective maintenance experience.
Importance Of A Clean Carburetor For Mower Performance
Understanding the critical role of a clean carburetor in the function of your riding mower is paramount. The carburetor’s primary job is to mix air and fuel at the ideal ratio for internal combustion. When the carburetor is contaminated with debris, the engine may run erratically, lose power, or fail to start. To prevent these issues and uphold your mower’s longevity and efficiency, a routine carburetor cleaning is essential.
Gathering Necessary Tools And Supplies
Prior to commencing the cleaning process, collect all the tools and supplies you’ll need. This organization ensures a smooth and uninterrupted workflow. Your checklist should include:
- Carburetor cleaner – a specialized solvent that removes dirt and grime.
- Screwdrivers – for opening the carburetor housing.
- Wrench set – to remove nuts and bolts.
- Pliers – for removing the clamps and other small fittings.
- Compressed air – to blow out any debris post-cleaning.
- Cleaning brushes – small brushes to reach into crevices.
- Replacement parts – like gaskets or O-rings, if needed.
Safety Precautions Before Starting
Adhering to strict safety protocols is imperative to avoid any accidents. Here are the crucial steps to take:
- Ensure the mower’s engine is completely cool before starting.
- Remove the spark plug to prevent any accidental starts.
- Drain the gasoline from the mower to eliminate any fire hazards.
- Wear protective gloves and safety glasses to shield your hands and eyes from chemicals.
- Work in a well-ventilated area to avoid inhaling fumes.

Credit: m.youtube.com
Initial Steps Before Disassembly
Welcome to the practical guide on how to clean your riding lawn mower’s carburetor. Proper maintenance is key to extending the lifespan and ensuring the smooth operation of your lawn mower. Before diving into the more technical aspects of carburetor cleaning, it’s crucial to implement some preliminary steps. These initial steps ensure your safety and prepare the mower for the disassembly process.
Ensuring Mower Is Cool And Fuel Is Off
Begin by making sure that your lawn mower engine is completely cool to the touch. A hot engine poses risks such as burns and could potentially vaporize fuel during your maintenance routine. After confirming that the engine temperature is safe, proceed to turn off the fuel supply. This prevents fuel leakage and reduces the risk of fire.
Detaching Spark Plug For Safety
To prevent accidental ignition, always detach the spark plug before working on your lawn mower. This simple action can be the difference between a safe maintenance session and a dangerous one. Locating and gently removing the spark plug wire will ensure the engine cannot start while you clean the carburetor.
Draining Existing Fuel From The Mower
With the engine off and spark plug disconnected, the next step is to drain any existing fuel from the mower. This is to prevent any fuel from spilling into unwanted areas, especially the carburetor itself, during cleaning. Use a fuel-safe container to collect the fuel. If your mower has a fuel valve, turn it to the ‘off’ position to stop the flow before removing the fuel line. In case your model lacks a valve, a siphon pump or a turkey baster can be used to empty the fuel tank safely.
Disassembling Riding Lawn Mower Carburetor
When it’s time to clean or repair your riding lawn mower’s carburetor, the first step is disassembling it with care. Below are detailed instructions that will guide you through removing key parts safely, ensuring you’re ready to tackle maintenance tasks with confidence. Remember to work in a clean, well-lit area and organize your parts as you remove them for an easier reassembly process.
Removing Air Filter And Housing
Start by removing the air filter and housing to gain clear access to the carburetor:
- Turn off your lawn mower and ensure it is cool before starting.
- Locate the air filter cover on the side of the engine.
- Unclip or unscrew the cover and carefully remove it.
- Take out the air filter, being cautious if it’s dirty to prevent debris from falling into the carburetor.
- Remove any screws or bolts securing the air filter housing to the engine.
- Gently lift off the housing and set it aside with the screws.
Disconnecting Fuel Lines And Throttle
With the filter removed, focus on the fuel lines and throttle connections:
- Position a container underneath the carburetor to catch any fuel that may spill out during the process.
- Clamp the fuel line or use a fuel line plug to prevent leakage.
- Carefully disconnect the fuel line from the carburetor. Use pliers gently if needed.
- Identify the throttle linkage and, if present, the choke linkage. Take a photo with your phone for reference during reassembly.
- Disconnect the throttle and choke linkages by releasing the springs or retaining clips.
Dismantling The Carburetor Components
The final step is dismantling the core carburetor components with diligence:
- Note the position of all components before starting.
- Unscrew the main cover or bowl of the carburetor, usually attached with screws or a nut at the bottom.
- Remove the bowl, being careful to not lose the gasket or O-ring seal.
- With the bowl removed, take out the float assembly and the needle valve underneath. Handle these parts gently.
- Pull out the jet(s) if they are easily accessible and unscrew them with the correct screwdriver or specialty tool.
- Keep all removed parts in a clean tray — keeping track of the order and orientation will simplify reassembly.
Each step in disassembling your riding lawn mower’s carburetor lays the groundwork for a thorough cleaning or necessary repairs. By following this guide, you can ensure that every component is handled with care, leading to better performance and longevity of your lawn mower.
How To Clean Riding Lawn Mower Carburetor
Maintaining a pristine lawn involves keeping your equipment in top condition. Cleaning the carburetor of your riding lawn mower is a crucial part of this upkeep as it ensures smooth operation and extends the life of the mower. Dirt and debris can obstruct the carburetor’s function, leading to poor engine performance or even failure to start. Follow these straightforward steps to clean your riding lawn mower carburetor effectively.
Inspecting The Carburetor For Dirt And Damage
Before diving into the cleaning process, it’s important to inspect the carburetor carefully. Look for signs of crud buildup, corrosion, or wear and tear that could impact its functionality. Here’s how to inspect your carburetor:
- Remove the air filter cover and the air filter itself to gain access.
- Inspect the carburetor’s throat for any debris or dirt accumulation.
- Check the gaskets and if they are worn out, consider replacing them to prevent air leaks.
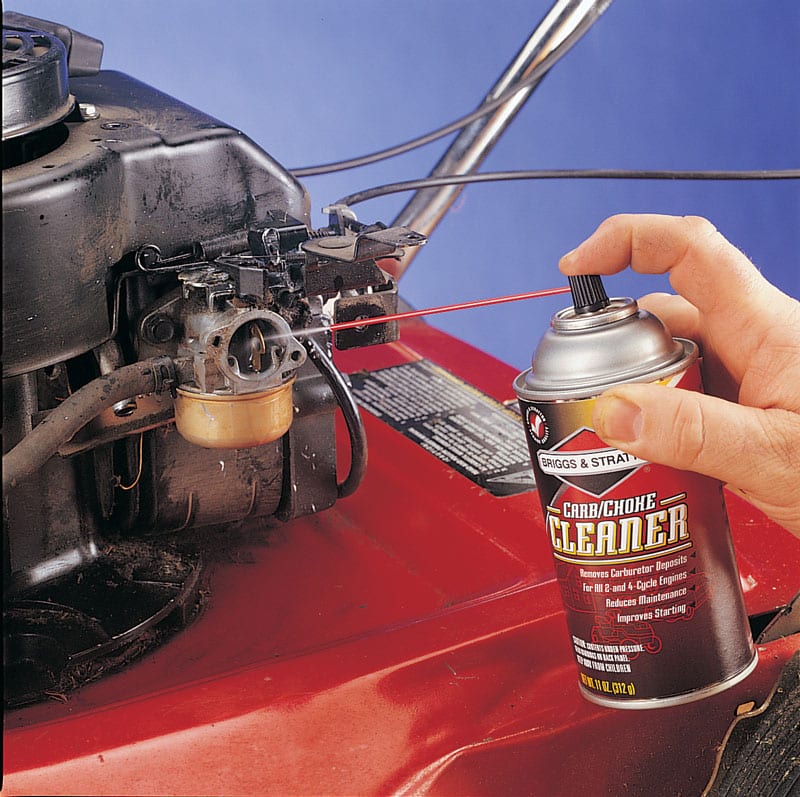
Cleaning Each Part With Carburetor Cleaner
With the carburetor exposed, use a commercial carburetor cleaner to take care of any gunk in each part. Here’s a quick list of steps:
- Detach the carburetor from the mower to ensure thorough cleaning.
- Disassemble the carburetor as per the manufacturer’s instructions, taking care to note the placement of each component.
- Spray the cleaner on each part, including the float bowl, needle, and jets.
- Leave the components to soak if necessary, especially if there’s hardened grime.
- Wipe the parts clean with a cloth and ensure that all cleaner residue is removed.
Using Compressed Air To Clear Out Passages
After all parts are cleaned with the carburetor cleaner, compressed air is an excellent tool for removing any remaining dust or particles. It’s particularly useful for clearing out small passages that can be quite difficult to reach. Follow these guidelines:
- Ensure all parts are devoid of cleaner fluid before using compressed air.
- Focus the compressed air into the carburetor’s passages, channels, and jets.
- Keep the air pressure at a safe level to avoid damaging any components.
- Reassemble the carburetor once all parts are fully dry and clean.
Reassembling The Mower Carburetor
Welcome back to our step-by-step guide on cleaning your riding lawn mower carburetor. With the cleaning process behind us, we now focus on the crucial stage of reassembling the mower carburetor. This phase is where attention to detail will ensure your mower runs smoothly, avoiding any leaks or performance issues. So, let’s get started on putting the pieces back together in the correct manner.
Reattaching Components And Ensuring Tight Seals
Once your carburetor is spotless and all the components are ready, it’s time to reconnect them with precision. Begin by aligning the gasket properly; this small piece plays a major role in preventing fuel leaks. If your kit came with a new gasket, discard the old one and use the fresh seal for better results.
- Inspect each component to ensure it’s free of debris before assembly.
- Set the float and needle into position, verifying their smooth movement.
- Reinstall the float bowl, making sure to align it perfectly before tightening it securely.
Remember to not overtighten the screws as this can damage the carburetor.
Reconnecting Fuel Lines And Throttle
With the internal components securely in place, it’s time to reconnect the carburetor to the mower’s engine. Reattach the fuel lines with care, ensuring that they fit snugly and there are no kinks or bends that could impede fuel flow. Using new clamps is a best practice to prevent fuel leaks.
- Slide the carburetor back onto the mounting studs on the engine.
- Reconnect the throttle linkage; this should snap back into place with a gentle push.
- Tighten nuts or bolts securing the carburetor to the engine, being mindful not to strip them.
Once all the connections are secure, give everything a once-over to ensure there aren’t any loose parts. A successful reassembly means your mower is almost ready to tackle your lawn once again.
Easy Steps To Test And Troubleshoot
Is your riding lawn mower refusing to start with the same vigor as before, or perhaps it’s running erratically? Before you consider a costly visit to the mechanic, a clean carburetor could rectify these common engine ailments. Tackling this task may seem daunting, but with the following easy steps, you can test and troubleshoot your mower’s carburetor and restore its performance efficiently.
Reattaching Spark Plug And Refilling Fuel
Preparation is key when diving into carburetor maintenance. Once the carburetor is clean and reassembled, your focus should shift to reconnecting the spark plug and ensuring a fresh supply of fuel for a smooth start-up.
- Check the spark plug for any damage or build-up and clean or replace it if necessary.
- Securely reattach the spark plug wire to ensure proper ignition.
- Refill the fuel tank with fresh gasoline, as old fuel can cause starting and running issues.
Starting The Mower And Observing Performance
Initiating the first start after a thorough cleaning is the moment of truth. You need to be observant to gauge how well the mower is operating:
- Turn the key or pull the start cord to ignite the engine.
- Listen for smooth running sounds; sputtering or hesitation could indicate additional adjustments are needed.
- Allow the mower to run for several minutes, monitoring for consistent performance.
Adjusting Settings For Optimal Running
The final step in the troubleshooting process is to fine-tune the carburetor settings. This ensures your riding mower runs efficiently:
- Locate the carburetor’s adjustment screws for idle speed and mixture.
- Make small, incremental adjustments while the engine is running, aiming for a smoother running engine.
- Allow the engine to respond to each adjustment, looking for enhanced performance.
Through these meticulous tweaks, your riding mower should return to its optimal functionality with minimal fuss.
Frequently Asked Questions Of How To Clean Riding Lawn Mower Carburetor
How Do You Clean A Carburetor On A Lawn Mower Without Removing It?
Spray carburetor cleaner directly into the air intake and throttle body. Let it sit, then start the mower to run the cleaner through. Repeat if needed.
How Do I Know If My Lawn Mower Carburetor Is Clogged?
A clogged lawn mower carburetor may show signs like starting issues, rough running, stalling, and excess smoke. Check for dirt or residue buildup as a confirmation.
Where Do You Spray Carb Cleaner On A Riding Lawn Mower?
Spray carb cleaner directly into the air intake after removing the air filter. Also, use it on the carburetor’s exterior to dissolve grime and buildup. Always ensure the engine is off and cool before applying.
What Are The Symptoms Of A Dirty Carburetor?
Symptoms of a dirty carburetor include engine stalling, rough idling, poor acceleration, and increased fuel consumption. Black exhaust smoke and starting troubles are also common indicators.
Conclusion
Maintaining your riding lawn mower is crucial for its longevity and efficiency. By following the steps outlined in this post, you’ll ensure your mower’s carburetor stays clean, resulting in smoother operation and fewer engine troubles. Remember, a little care can go a long way in keeping your garden’s champion running like new.
Happy mowing!